
 |
|
|||||||
| Home | Forum | Online Store | Information | LJ Webcam | Gallery | Register | FAQ | Community | Calendar | Today's Posts | Search |
 |
|
|
Thread Tools | Display Modes |
|
|
#321 | |
|
Senior Member
Join Date: Nov 2005
Location: Table 17, Bay Park Fish Co.
Posts: 943
|
Quote:
|
|
|
|

|
|
|
#322 |
|
Senior Member
Join Date: Mar 2005
Posts: 116
|
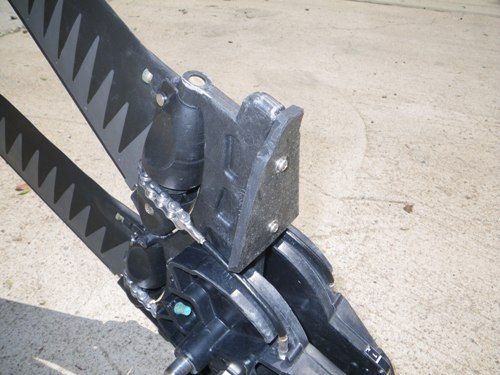
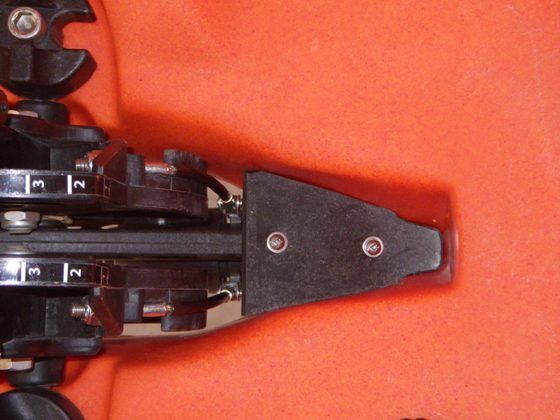
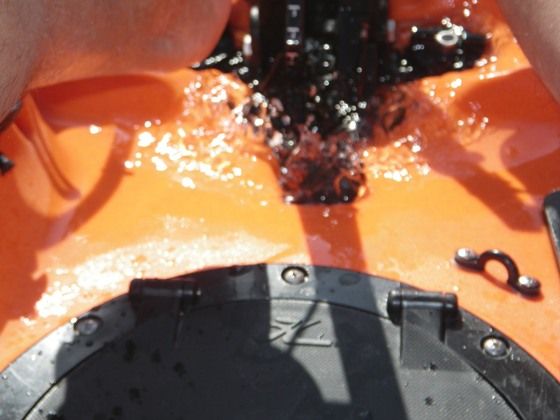
Mirage Drive Splash Dam
When a Hobie is cruising above 4 mph, the power produced by the turbo fins forces an excessive amount of water up through the Mirage drive opening. To minimize this, I cut a piece of 1/4" rubber to fit snugly at the end of the drive opening. 2 screws holds it securely to the drive unit. The last picture shows the amount of water in the kayak with the dam in place and peddling about 4.5 mph.
|
|
|

|
|
|
#323 | |
|
Senior Member
Join Date: Apr 2010
Posts: 6,856
|
Quote:
__________________
 www.facebook.com/Teamsewer |
|
|
|

|
|
|
#324 |
|
Senior Member
Join Date: Mar 2005
Posts: 116
|
Externally Mounted Transducer
When I picked up a Lowrance FF, the shape of the transducer convinced me to try an externally mounted, articulating transducer arm. I used plastic bimini top parts for the pivot points (end caps) and the base (deck hinge). It took a few adjustments to get the correct arm lengths and the proper angle entering the water. The first trials were unsuccessful because at higher speeds, air bubbles would form and cause vertical lines in the display (dropouts).
I'm still not sold on this method because it is more maintenance than a below deck mount. However, it may help give someone ideas for making a portable transducer arm. 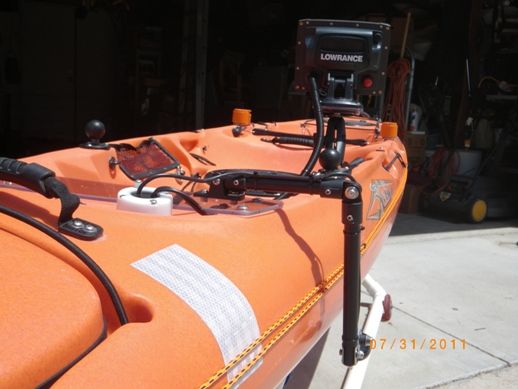 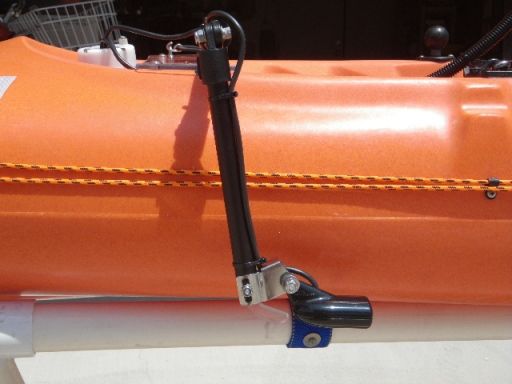 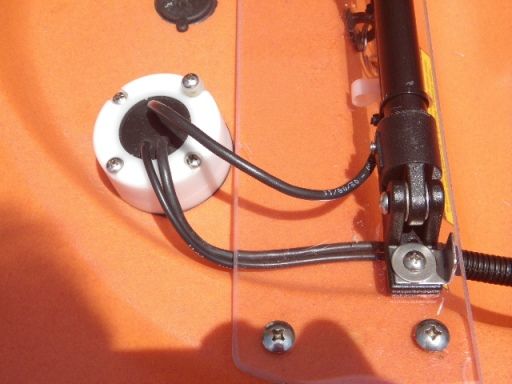 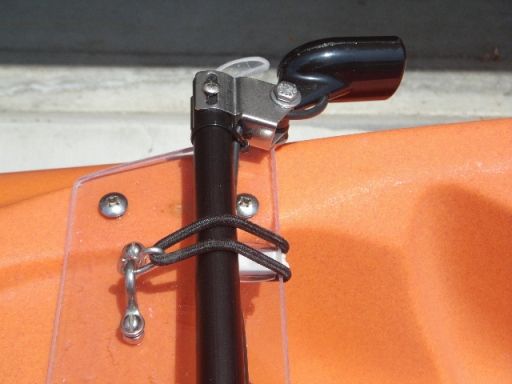 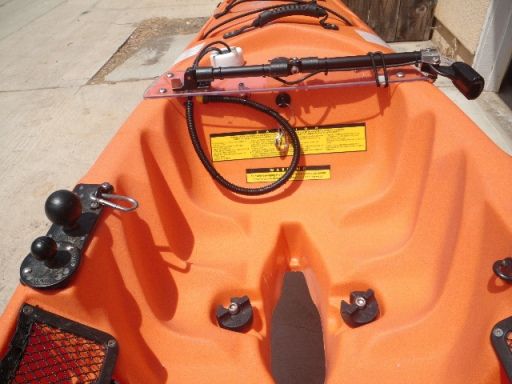 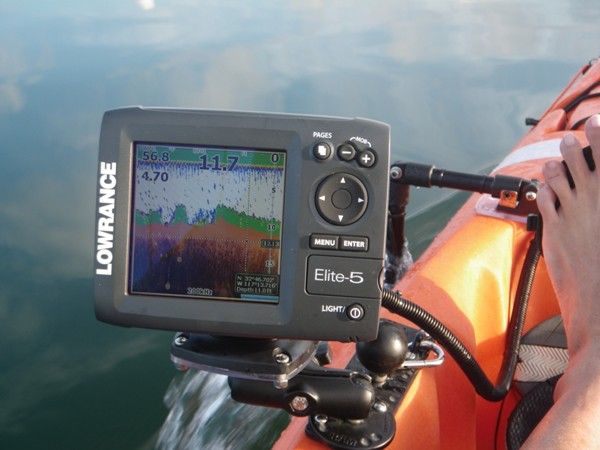
|
|
|

|
|
|
#325 |
|
Senior Member
Join Date: Mar 2005
Posts: 116
|
|
|
|

|
|
|
#326 |
|
Senior Member
Join Date: Jun 2010
Location: Under a bridge
Posts: 2,169
|
Check out Mad Frog Liberaror. basically what you have there.
|
|
|

|
|
|
#327 |
|
Senior Member
Join Date: Mar 2005
Posts: 116
|
I like the smaller tubes they used, but I wasn't about to spend $40.00 for one! Mine cost under $10.00. One of the reason for posting is to show some of the newbies alternatives to buying pre-made products. I remember a while back there were some discussions on how to make something like this.
Last edited by fongman; 01-26-2013 at 08:20 PM. Reason: * |
|
|

|
|
|
#328 |
|
Olivenhain Bob
Join Date: May 2008
Location: Olivenhain, CA
Posts: 1,121
|
100,000 Views
It was another dark and stormy night, not unlike the one about three years ago when I submitted my first contribution to the "Share Your Innovations" thread. After reading the most recent posts in this tread, I noticed that the number of views had just clicked over 100,000. Wow, that seems like a lot to me.
Just for fun, I started at the beginning and reviewed all the posts in this thread. There is a lot of good stuff in there. I counted at least a dozen great ideas that I have borrowed and personally used. Thanks to all who have contributed over the years and also to BWE for making this milestone possible. Bob |
|
|

|
|
|
#329 |
|
Senior Member
Join Date: Jun 2010
Location: Bay Park
Posts: 559
|
Hobie Baitank Drain location modification
We'll after a series of events I decided to try adding a bait tank modification to my Hobie Bait tank. I purchased a scupper hole mount for my new fish finder so I could get some accurate reads. Then my Hobie bait tank was missing its drain hole. The water would almost fill up the back of my Outback making it a heavier and sloppy ride. So heres what I did. I figured that if I want to switch back I can always cap the hole.
|
|
|

|
|
|
#330 |
|
Senior Member
Join Date: Jun 2010
Location: Murrieta, CA and Bonney Lake, WA
Posts: 425
|
ChuckD. Very interesting. I am not ready to modify the Bait tank just yet, but this is a good idea. Do you notice a drastic improvement on the FF? I am sure the temp reading is helpful.
|
|
|

|
|
|
#331 |
|
Senior Member
Join Date: Jun 2010
Location: Bay Park
Posts: 559
|
Stan,
Whats up bro! I have to say the readings are spot on now. It is a slight improvment in quality of finder since my hummingbird, but I believe having the ducer in the water sure is nice. Perfect temps and spot on readings. I had a seal buzzing my yak the other night for about an hour which gave me some time to test the accuracy, it worked great. Found some great structure too, landed me a nice fat bug! Hope all is well man, cant wait till the big trip. |
|
|

|
|
|
#332 |
|
Senior Member
Join Date: Apr 2010
Location: san diego
Posts: 144
|
Yakima J Cradle Fix
So I was getting tired of having my cradles rotate everytime I hit with my kayak. The Yakima bars are round and no matter how much I tighten them the alwys end up like this.
So I figured there has to be a way to keep them straight so over to Home Depot I went and $8 later here's the finished solution. I took a couple of 3/4" electrical conduit, cut it to the correct size, drilled a couple of holes in each end to line them up with the J cradles, flattened out the ends a bit and now they don't rotate. |
|
|

|
|
|
#333 |
|
Team Keine Zugehörigkeit
Join Date: Nov 2010
Location: Way out there
Posts: 2,854
|
Wet transducer scupper mount.
So I'm considering a hobie bait tank, but having the the toro sprinkled head holding my transducer in place no water can get out.
so it was time for a change. I came across a guy that made a custom mount for his here, http://www.yakangler.com/forum/21-lo...son-kayak-cuda After looking it over as well as the Lowrance one I decided it cant be that hard to make one that allows water to flow out if I do decide to get a Hobie bait tank. The Lowrance uses a plastic piece of all thread as well as a "doughnut" to hold the transducer in place which to me seems like a design flaw. So I got some 1/16 thick aluminum, a 1/4 dia x 1 inch long stainless nut, bolt and lock washers, a 3/8 by 3 inch long all thread and the nut to go with it. last a 4 square inch 3/16 thick piece of ABS plastic. After all the measuring this is what I came up with. I plugged the open scupper filled my current bait tank to the brim and let it drain into the well area as the hose was running keeping the tank level for about 20 mins, it didn't flood and looks like this might be a viable option but without being on the water I'm not 100% sure that it will drain. So some OTW testing will be needed before I commit to the Hobie. alum stock.jpg top plug.jpg unit.jpg unit and trans.jpg 001.jpg bottom close up.jpg bottom front.jpg bottom side 1.jpg front to back.jpg top view.jpg
__________________
 Não alimente os trolls------------Don't feed the trolls---------------インタネット荒らしを無視しろ 
|
|
|

|
|
|
#334 |
|
Senior Member
Join Date: Jan 2013
Location: Otay
Posts: 704
|
I wanted so bad to have a wet scupper mount application for the deucer but, because of its unnatural bulge, and having to be constantly concious of not dragging it on whatever surface I launch from or my tailgate I decided against it. This is an alternitive that I found works quite well. DUCT SEAL. Its practically play-dough. Except for the fact it can get wet, not harden, holds its shape, causes no permananet damage, isn't messy, etc... Here is how I applied it. I made a little pool around the transdeucer with it and just splash some water in it to help in the temp reading. Even used a little on the bottom of my battery box to hold it wedged in place. This stuff rocks. A 16oz package cost under 3 bones at lowes. Best part is my FF is still in practically new/unused condition. Its just nice to keep nice stuff nice. Hope this is exactly what somebody was looking for!
And the same boys that drag my rig up on the beach after I'm done fishing, helped install the FF! If you got 'em, put 'em to work!  YAK.jpg YAKK.jpg YAKKK.jpg YAKKKK.jpg YAKKKKK.jpg |
|
|

|
|
|
#335 |
|
Team Keine Zugehörigkeit
Join Date: Nov 2010
Location: Way out there
Posts: 2,854
|
The prob I see with the duct seal is that its not strong enough to hold if you put something inside the hatch that can dislodge it, say the wheels off of your cart or a big fish. I also keep a kill bag with ice packs in the hatch which would throw off the temp readings. I have had my transducer thru the scupper since I got the kayak. I transport it in the back of my truck and surf launch and land on a regular basis. You just got to be mindful of it. As you can see its pretty scratched up but it works like the day I got it.
__________________
 Não alimente os trolls------------Don't feed the trolls---------------インタネット荒らしを無視しろ 
|
|
|

|
|
|
#336 | |
|
Senior Member
Join Date: Feb 2011
Location: Corona, CA
Posts: 472
|
Quote:
Let me know how it works out Bus. |
|
|
|

|
|
|
#337 |
|
Team Keine Zugehörigkeit
Join Date: Nov 2010
Location: Way out there
Posts: 2,854
|
I will post up some OTW video asap slated to work the next 16 days straight

__________________
 Não alimente os trolls------------Don't feed the trolls---------------インタネット荒らしを無視しろ 
|
|
|

|
|
|
#338 |
|
Senior Member
Join Date: Feb 2011
Location: Corona, CA
Posts: 472
|
|
|
|

|
|
|
#339 | |
|
Senior Member
Join Date: Mar 2010
Location: San Diego
Posts: 2,385
|
Quote:
__________________
No better time than being on the water, God Bless, JimmyZ 
|
|
|
|

|
|
|
#340 |
|
Senior Member
Join Date: Nov 2011
Location: Newport Beach, CA
Posts: 126
|
PA External Bow Storage Bungee
PA12 External bow hatch storage. Quick and easy option to stash some stuff during launch or throughout the day!
|
|
|

|
 |
| Tags |
| kayak fishing inovations, kayak rigging ideas |
|
|