
 |
|
|||||||
| Home | Forum | Online Store | Information | LJ Webcam | Gallery | Register | FAQ | Community | Calendar | Today's Posts | Search |
 |
|
|
Thread Tools | Display Modes |
|
|
#61 |
|
Senior Member
Join Date: Mar 2005
Posts: 116
|
Hobie Adventure Mods
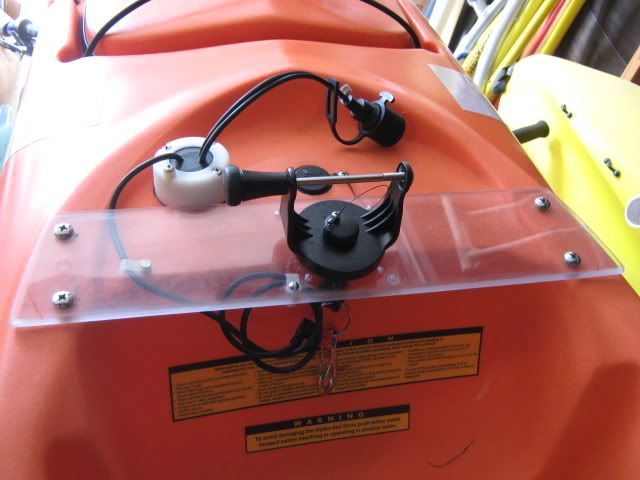 I made aluminum mounting plates for the ones behind the seat. These are used to support the pvc rodholder I made. The plate provides front-to-back stability while the V construction provides side-to-side stability. Other features that I like of this rodholders design is that they are angled at about 45 degrees, they have a low center of gravity, the mass is kept close to the centerline of the kayak, and the rods are within easy reach. In addition, they point slightly forward or back, depending upon which direction they are mounted. When pointed forward, the tips of the rods can be seen without much effort. 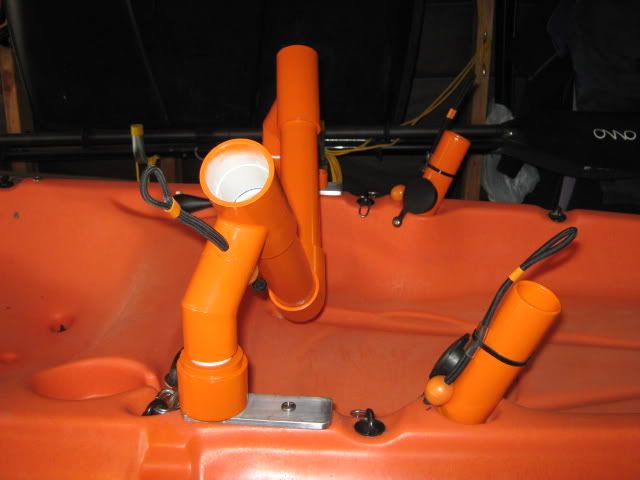  I also built some extension tubes for the builtin rodholders. I use these for my bass rods. Electrician tape wrapped over one layer of corktape on 1 1/4" pvc creates a snug fit. Instead of using lanyards to secure the rods, the bungies are looped over the reel handles. |
|
|

|
|
|
#62 |
|
Olivenhain Bob
Join Date: May 2008
Location: Olivenhain, CA
Posts: 1,121
|
Very cool Fongman. I really like the bungee loops on the rod holders. I will be adding them to all of my rod holders. What a great idea.
Can you post a photo that details that design? What did you use to attach the bungee cord together to make the loop? Bob |
|
|

|
|
|
#63 | |
|
Senior Member
Join Date: Mar 2005
Posts: 116
|
Quote:
Those are pre-made for tarps. You can get them at any DIY store. I just shortened the ones on the extenders and slipped a 1" piece of plastic tubing over it so I could attach the zip tie. |
|
|
|

|
|
|
#64 |
|
Junior
|
ill have to try some of your ideas
|
|
|

|
|
|
#65 |
|
Junior
Join Date: Nov 2009
Location: Orange County
Posts: 28
|
My vote goes to Jim....
|
|
|

|
|
|
#66 | |
|
Senior Member
Join Date: Jan 2009
Location: Rancho Cucamonga
Posts: 753
|
Leak
Quote:
 ffice" /> ffice" />My fear of separation of the wet transducer, 4in PVC pipe and hull came true. I don’t know if it was from loading and unloading on the truck, the beach landing at LJ the other day, or the constant hull movement from my peddles, but regardless, when I went out on Sunday it was dry. When I added water it leaked immediately. While I think the wet transducer is a neat set up, I think I am going back to the thru-hull-goop method. I am not totally convinced the image quality of a wet mount is that much better than the 'shoot through' system. It’s definitely more of a hassle and you have to be cognizant of the damn pipe when loading up. I might try installing the transducer through the rear hatch vs. in the front hatch.....any thoughts???
__________________
GO ARMY BEAT NAVY! Bad decisions make great stories! 
|
|
|
|

|
|
|
#67 | |
|
Olivenhain Bob
Join Date: May 2008
Location: Olivenhain, CA
Posts: 1,121
|
Quote:
Bob |
|
|
|

|
|
|
#68 |
|
Senior Member
Join Date: Aug 2009
Location: Carlsbad
Posts: 591
|
A simple transducer solution
I also tried the wet install using a rectangular walmart brand drybox. Worked great the first time but on the second trip the rough launch knocked around some items in my front hatch and the goop failed. No water = no finder that day.
I copied an idea from the darkhorse but mine uses the factory transom mount to attach the transducer to the sail mast on my revolution and all it does is sit flush to the hull. I add maybe a cup of water in the hull and voila. The zip ties are snug but not impossible to move and re-position. They can be swapped out in a second and it is difficult for anything to bang into it and cause it to shift. Worst case scenario, you slide forward and readjust. It picked up a signal instantaneously and never lost the bottom even through the 15 knot winds on Sunday PM. That area of the revo is a natural low spot and doesn't need much water to perform perfectly. I really like that the transducer sits behind the mast and doesn't come into direct contact with other items in the front hatch. I never had a good reading with two different goop installations.  I did not add the factory lock washers on the main bolt/cotter pin that holds the transducer to the transom mount so that gravity will naturally hold the transducer flush with the hull.  If you really want it permanent, buy a clamp that will fit on the other side of the sail mast and clamp it in position. 
|
|
|

|
|
|
#69 |
|
Senior Member
Join Date: Jan 2009
Location: Rancho Cucamonga
Posts: 753
|
Thats cool. I will give it a shot. Maybe I can fabricate a clamp??
__________________
GO ARMY BEAT NAVY! Bad decisions make great stories! 
|
|
|

|
|
|
#70 |
|
Senior Member
Join Date: Aug 2009
Location: Carlsbad
Posts: 591
|
a rod clamp might work??? But seriously, I don't think you need anything more than the zip ties. Just check before launching and have a few spares with you.
|
|
|

|
|
|
#71 |
|
Member
Join Date: Dec 2008
Location: Orange County
Posts: 39
|
Only a cup of water? Doesn't the water end up under the seat? I always thought the bottom of the transducer had to be submerged in goop or water to allow the signals to pass thru the hull. If that isn't the case, why bother with the goop?
|
|
|

|
|
|
#72 |
|
Senior Member
Join Date: Jan 2009
Location: Rancho Cucamonga
Posts: 753
|
I re-read your post....are you say you toss into the boat a cup of water? Why? doesn't the transducer below the waterline? Help me out here. I like the set up!
__________________
GO ARMY BEAT NAVY! Bad decisions make great stories! 
|
|
|

|
|
|
#73 |
|
Olivenhain Bob
Join Date: May 2008
Location: Olivenhain, CA
Posts: 1,121
|
Can you get a decent reading without having water in the bottom of the hull? If so, this might be a really good way to go.
As a practical matter, most kayaks usually have a little water splashing around, at least mine does. If the transducer is mounted in a space where it is in the lowest part of the hull you should always have some water surrounding the unit. If the transducer is secured tightly to the hull, I suspect that not much water would be needed to make the thing work. If the lowest place in the boat is not by something you can attach to such as the mast in your example, there is another easy way to strap a transducer to the hull so you can position it just about anywhere. I did this to secure my battery case below the rear hatch in my Revo. Just take two plastic eyelets, (OEX has them), and goop them to the hull on either side of whatever you want to strap down. After the glue has cured, run some webbing with a cinch buckle through the eyelets and strap down the unit. You could also use some bungee material. Bob |
|
|

|
|
|
#74 |
|
Senior Member
Join Date: Aug 2009
Location: Carlsbad
Posts: 591
|
Trust me it works. I doubt Josh P. would use this method with his high end finder if it didn't.
You need some water touching the transducer, but not alot. My boat, knock on wood, is pretty dry, so I add a cup or so once I'm ready to turn it on. I can't speak for other yaks, but with the Hobie revolution the sail mast area is very low and the water never leaves that area even when the new seaforth is throwing up 4' wakes. There were serious whitecaps and swell on the water at 5PM on sunday and my finder never faltered. After the wind subsided, I checked the hull to see if much if any water entered and it was about the same level. The beauty of this system is you can start with very little water. If your reading comes and goes, just add more water. |
|
|

|
|
|
#75 |
|
Senior Member
Join Date: May 2007
Location: S.D.
Posts: 133
|
my plan is bait tank/ rod holder, rod holder and the pipe transducer mount. i have found a scrap 13 inch drain pipe about 12in long when they were doing the sewage repair at my work, that i will be using as a bait tank with built in rod holder and make a contraption rod holder that will use the existing molded rod hoder on my recently bought revo. the bait tank will be kinda like the hobie bait tank, i am thinking may be 5-6 rod holder n built in batery holder too. and i thank everyone here for the great ideas and insparation. right now i am gathering the material i might take me a week to finish the project due a little 1yr todler running around that touches everithing she see .
|
|
|

|
|
|
#76 |
|
Junior
|
something
just killing time with my daughter new at this and getting ready for mexico
|
|
|

|
|
|
#77 |
|
Senior Member
Join Date: May 2007
Location: S.D.
Posts: 133
|
bait tank and rod holder
here is the pic t6ures of the bait tank i was working on and test it last saturday, and it work great and the rod holder look good to but havent realy tested the rode holder yet since o got skunk on sat. i thank everyone on this board for the ideas and innovative from this community. tight lines to everyone and be safe out there
|
|
|

|
|
|
#78 |
|
Senior Member
Join Date: Mar 2005
Posts: 116
|
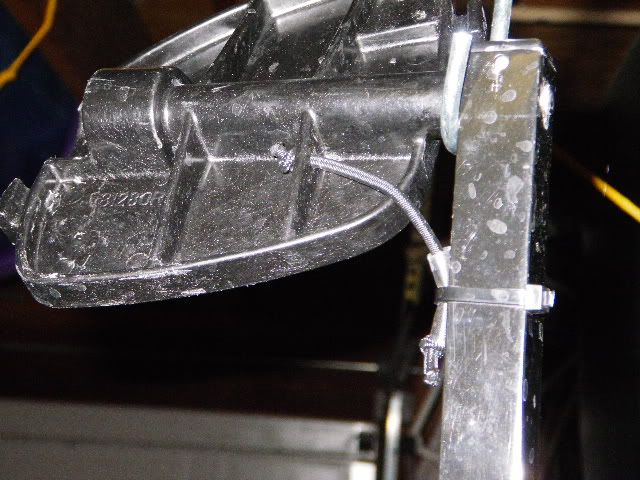
Here's one for the Hobie guys who haven't already remedied the flip flopping peddles. Jared at FastLane showed me how the new Hobie peddles have solved the problem. A small piece of 1/8" shock cord is attached from the top of the crank to the backside of the pedal. This is how I adapted this method. It is much lighter than gooping 2 oz weights to the bottom of the pedals.
 If you want to put standard size lure boxes inside of your kayak, this method will keep them from moving and when you use the bungee, it will secure them in case you flip.  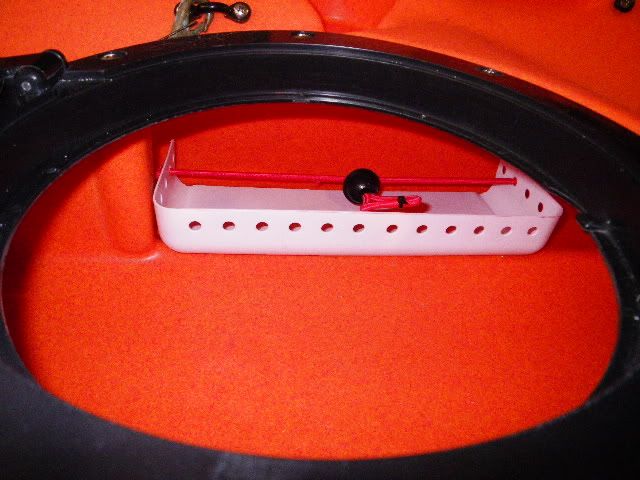 I took a container like this and cut off the bottom, then split it in half. 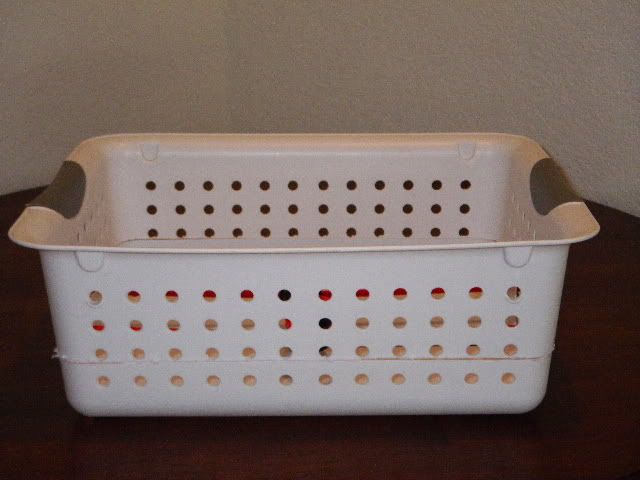 Take a tarp bungee and pull the knot out of the ball. Cut off the knot and then attach each end to a side of the tray holder with an overhand knot. Adding a drainage hole in the corner will keep any water from collecting inside of the holder. Goop it in place and you're done. 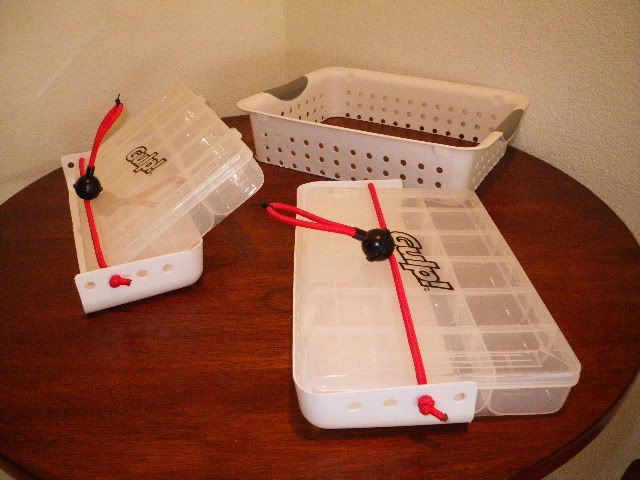 The last idea is more of a tip. Keep a supply of 1/8" stainless steel rod is handy. I have used it to make replacement hooks for rubber straps, dehookers, screen the outflow tube of a bt, bottom for rodholders, 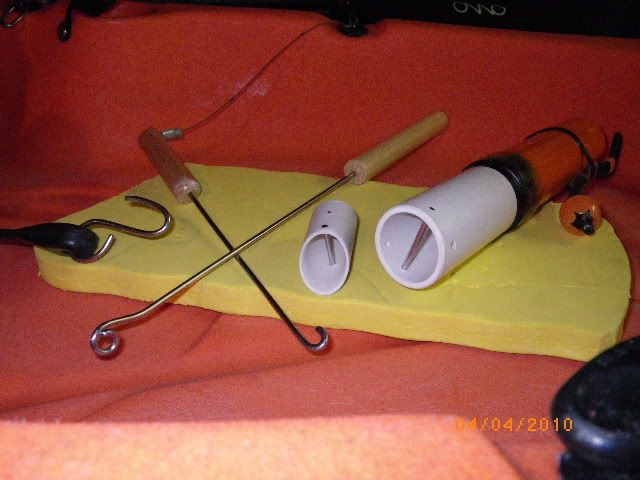 sliding bungee hooks, and loops added to eyelets so additional connections can be made to it. 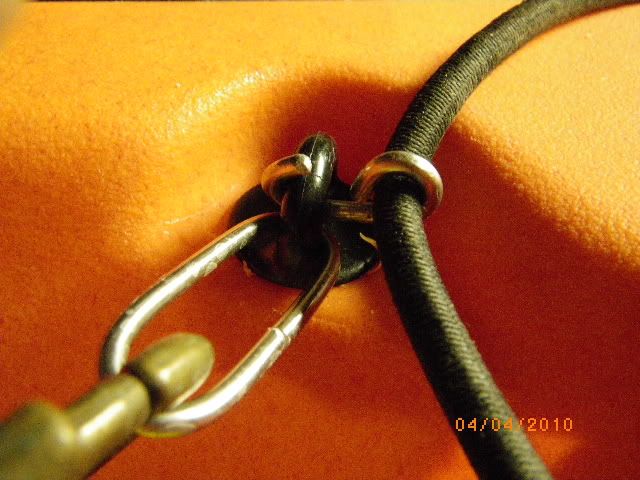 Industrial Metals Supply carries it in 10 foot (?) length for not too much. |
|
|

|
|
|
#79 |
|
Member
Join Date: Nov 2009
Location: oceanside
Posts: 32
|
not really my innovation but it was pretty cool. was fishing the oside harbor on monday and ran into a guy that turned his rear storage area into a seat for his kid. he put in some eyelets and mounted a seat there. they just sat back to back and the kid fished backwards... i dont have any kids but thought it might be useful to someone..

|
|
|

|
|
|
#80 |
|
Senior Member
Join Date: Feb 2009
Location: torrance
Posts: 155
|
|
|
|

|
 |
| Tags |
| kayak fishing inovations, kayak rigging ideas |
|
|